Thrifting antique furniture is a hobby for many people, myself included. You can find some fantastic pieces digging through old treasures, not to mention for dirt cheap. And it’s no wonder it’s a hobby for many people. Thrifting can be therapeutic to some extent. The same goes for refinishing furniture. And to be quite honest, wood furniture often just needs a little elbow grease to clean it up and make it come to life. I’ve done it a few times and even flipped furniture for a small profit. Each project has many learning lessons, and there are many ways to refinish wood furniture. Still, my favorite is how paint transforms the look of a piece of furniture and impacts a room. So here is a guide on how to transform furniture with paint. A couple of coats of color, and you have yourself a new look. Yes! You can do this too.
It dawned on me
Up until recently, I never quite realized how long furniture lasts. It’s a really long time, you guys. Some, if well built, last a lifetime. Has it dawned on you yet? The couch you bought and are sitting on reading this will likely last you, at least, ten years. Yeah! I looked at my set of sofas the other day, and I was like, well, I guess I better like these for a while. If you’re lucky, you’ll buy furniture a few times in your lifetime. Why do I say all of this? To tell you to purchase furniture you genuinely love. Because you can live with good quality, comfortable furniture for many years and never get tired of it if you love it.
NEW LOVE, NEW LIFE
And you can love furniture that’s been loved before, like antiques. You can even love new furniture and want to change it. Oh, I can see the red lights going off and panic on your face. “Why would you paint anything new?” Take a deep breath for me. A coat of paint is entirely fixable. Trust me, I’ve been there too. I bought a cheap cube organizer from Target, completely new, and seriously contemplated on painting it. But I went back and forth. Should I paint it? Should I just leave it as is? I tortured my self for a whole week with these thoughts and finally I said, “I’m painting it, if I don’t like it, I’ll repaint it or buy something else.”
organized entryway
This whole thing started when we move into our first house. We were excited to own a little piece of Texas real estate and allthough we’ve moved, more than a few times by now, that was the house is where I discovered my love for DIY.
Of course I had a vision for every room. It came natural. Well, except the entryway. It paralyzed me. Mainly, it was difficult to envision what I wanted the entrance to look like or how I wanted it to function. But once I figured our entryway was a dumping zone, I knew we needed organization. That’s where the famous storage bin came into play. My very first DIY project. Which I purchased for $80 might I add.
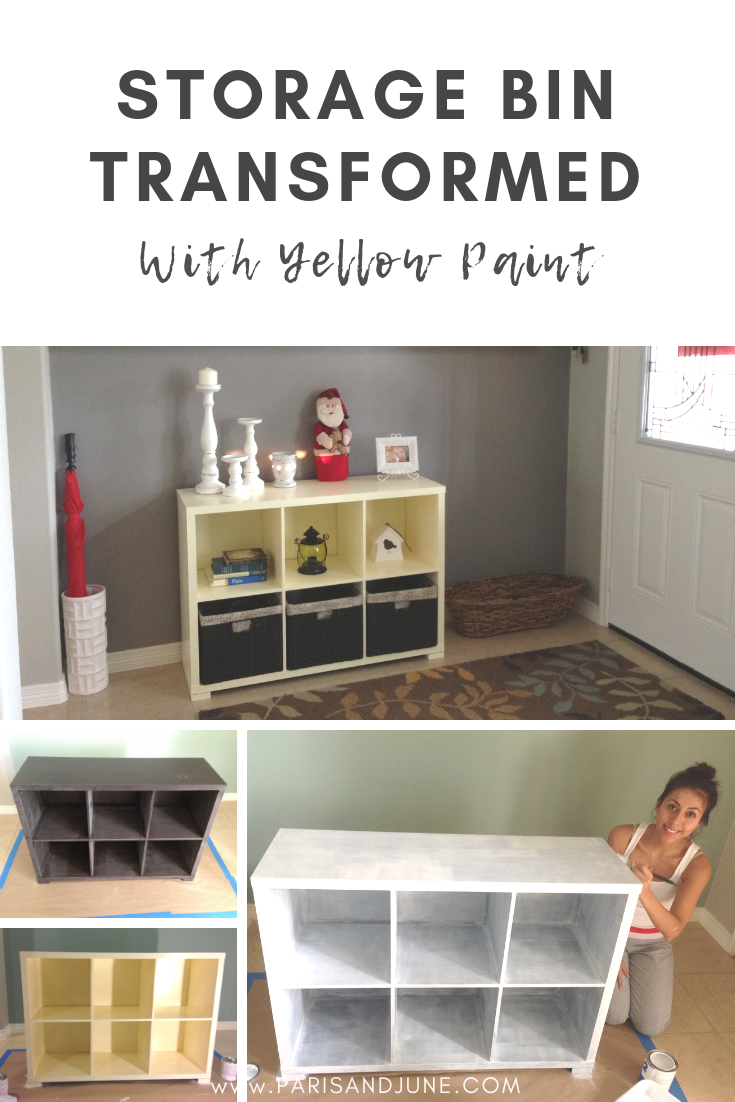
The problem I encountered with the storage bin was the color, an ebony/espresso shade. And although Ebony is a beautiful color, it was too dark for my taste and the look I had finally agreed on for the entry. A clean, bright, and welcoming space.
Since we didn’t have a lot of disposable income for a custom piece I decided to paint this bad boy and it was the best decision for that entry space.
Item Details: Storage Organizer, Weaved Baskets, Picture Frames from here and here, Shelves, Candle Pillars, Rug and the umbrella holder, Christmas Decor, Long Storage Basket, Paint Supplies

COLOR & PAINT CHOICE
I love a bright yellow, but I didn’t want it to overpower the entry, so I went with a very light and subtle yellow. Because I wanted the paint to stay on forever, I decided to go with an oil-based paint. Let me tell you, oil-based paint is thick and almost sticky but once dried it is durable and top quality. But I recommend a well ventilated area to paint because it stinks. lol. Well and the odor would probably make you high.
Below are the supplies you will need and step to follow.
Paint Color Details
Storage Bin: Hawthorne Yellow by Benjamin Moore.
Wall: Galveston Grey by Benjamin Moore

SUPPLIES
- Construction Grade Paper
- DIY Tape (To hold the paper down)
- Liquid Sander (Comes in a bottle. See why I used liquid sander below.)
- Paint Thinner (*ONLY if using oil-based paint. It is to clean up brushes and rollers)
- Rags (I used one of Cecil’s old T-Shirts. Cut it into three pieces. He didn’t realize it until he was helping me. Ha.)
- Primer
- Paint (The amount depends on the size of your project. For mine I used 1/4th of a gallon)
- Paint Tray
- Paint Tray Liners
- Paint Brush (Recommended: Shorter hand stem, or hand paintbrush so you can get in the corners)
- Paint Roller (Recommended: Smooth Surface Roll)
- Wipe on Polyurethane or wax
PAINTING PROCESS
- Prepare the work area. Tape down Construction paper. Make the space big enough to work with brushes.
- Move your piece of furniture onto the work area.
- If you didn’t purchase rags and you opted out for the Husband’s T-shirt, proceed to cut it into three equal parts. Set aside.
- Take one of the rags and clean the furniture you are going to paint. Remove all dust and dirt. A dust rag will come in very handy. Set cloth aside.
- This step is optional. You can place liquid sander in a handheld paint tray. Dipping as you go. I was a bit lazy so I just poured small amounts of the liquid sander onto the rag every time I ran out. *I used liquid sander instead of a real sander because the storage bin is not real wood. It’s a plywood material which would probably not withstand a real sander. Normally the liquid sander will remove any shine and help the paint stick. If the piece you are finishing is real wood, I recommend using a real sander.
- Wipe down the storage bin, or whichever piece of furniture you’ve elected to refinish, with the liquid sander using one of the three rags. Follow the instructions per the bottle.
- Once the liquid sander does its job, it is then, time to prime. Prepare the surface area again by wiping down any excess dust or dirt. Always start with a clean slate, it will help the paint stick and last many years.
- With a roller, begin priming any areas you plan on painting. Wait for about three hrs then apply a second coat. To assure the primer is completely dry, I recommend waiting six hours before applying the first coat of paint. Once dry, again wipe down any excess dust.
- Apply the first coat of paint. Yay! Now were are getting somewhere. Wait at least six hours before applying the second coat.
*TIP: For the best results add light amounts of paint on the roller. Too much paint on the roller can result in air bubbles and not so pretty clumps. Remember nice and light. Easy does it! - Apply a second coat of paint, once the first coat is completely dry. Two coats are normally enough with oil-based paint but if you find areas in need of a third coat, then I would wait for 8hrs for the second coat to dry and apply a third coat. Whether applying two coats or three, wait a minimum of twelve hours before applying polyurethane or wax.
- When your project has finally been transformed by your hard work and layers of sweat, blood, and tears, it is ready to be sealed.
- Take the third rag and use it to wipe on the polyurethane or wax. (Depending on finishing choice. The poly will give it a shinier finish. The wax makes it less shiny.)
*Warning: Paint thinner is required to clean up brushes or rollers at the end of your painting session. (Unless you plan on buying new ones every time ). The smell of oil-based paint is very strong. I recommend DIYing in a well-ventilated area.
I don’t recommend this project to pregnant ladies. If you are pregnant, please be mindful of the chemicals and the strong odors. If you really want something refinished that requires paint thinner and oil-based paint, have your hubby, family, or friend do it for you.
* Unfortunately, I don’t have pictures of what the storage organizer looked like before I painted it. If not I would show you how dark this storage bin was but here is the process during the layers of new paint.


test of time
It’s been 10 years since I painted that piece of furniture it still hasn’t chipped, at all but since it’s particle board it started to warp in the middle. I think I definitely got my money’s worth: $80 for a storage bin and $30 in paint supplies.
Whether you’re looking to revamp an entire room or just a small piece of furniture, consider paint. It’s incredible to see how paint can transform furniture.
If you found this tutorial helpful share it with your DIY friend using the share buttons below.
Thank you so much for reading!
With love and gratitude,


