Want to learn how to make a cheap wood sign? You’ve come to the right place.
Maybe you’re a little like me and you like to give gifts that have some meaning. This post is for you. Here is how to make a cheat wood sing in 13 easy steps. Not only does this gift have meaning, it’s easy on the budget and can be customized.
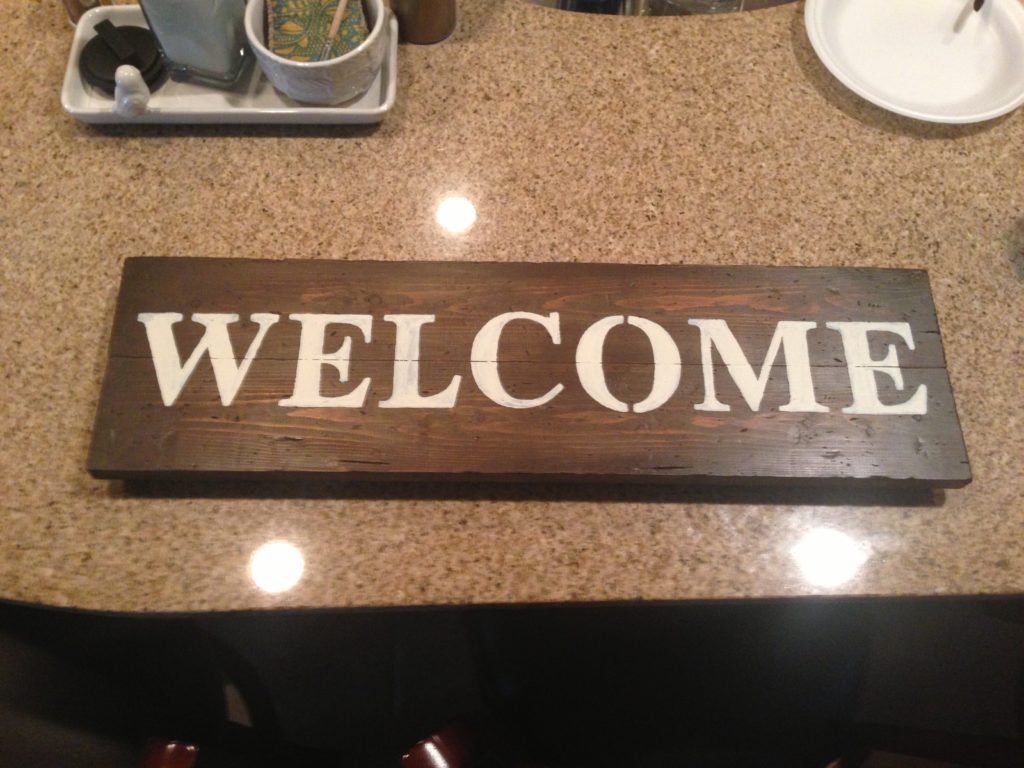
When my brother-in-law built his barn, I wanted to make him a sign that went with his new man cave. A “Welcome” sign was perfect. This DIY is simple, cheap and the result is unique. He really liked it so I figured I’d share with you.
PROJECT DETAILS
DIMENSIONS: 1in X 8in X 24in.
COST: When I made this sign, it didn’t cost me a dime because I already had everything I needed. However, I will break the costs down for you and if you need to purchase all the supplies listed below then expect to pay approximately $26. The price listed is for buying an entire container of wood glue, stain, paint, and polyurethane. When finished, you will have all of the supplies purchased like new because this project doesn’t require much.
TIME: The project will take approximately 12 hours total. Now I know that sounds like a lot of work, and you probably think “I don’t have that kind of time” but trust me, 95% of it is drying time. I completed this on two weeknights. On a Wednesday evening after work, I looked through my wood pile, picked the what I needed, and asked Cecil to cut it for me. He had that cut in two minutes. Probably took him longer to plug in the miter saw. I then sanded, stained and set aside to dry while I finished cooking dinner. Don’t feel pressured to wait around while this project dries. Put a load of laundry in the washer, cook dinner, and don’t stop what you have going on. It is a super easy project for a small price. That’s what I call, a Win-Win!
TOOLS
- Ear Plugs. When cutting wood, I recommend protecting your ears. The machines are loud and can damage your hearing.
- Safety Goggles. Your eyes are delicate and protecting them should be a priority; especially when cutting wood.
- Miter Saw to cut the wood board to the precise measurements.
- Sanding Sponge to sand the edges of the wood board.
- Dense Foam Paint Brush to paint the letters on the wood, which I bought at Michael’s, but here is a similar one.
- Plastic letter stencils. I found mine at Hobby Lobby a long time ago, and I remember using their coupon. Win!
- Pencil to mark your measurements.
- 2 Rags or cut up parts of an old T-shirt. These are one for staining, the other for wiping on polyurethane.
- Old sock. You know you have one of those long-lost soles somewhere.
- Nails, screws, nuts, and bolts (handful). You could use a chain. I didn’t have one, so I improvised.
- Drill, to make two holes when you’re finished.
SUPPLIES
Most of our supplies we bought at Lowe’s, Michael’s and Amazon because it so happened at the time were a better price in comparison to other stores. A couple of times, I was able to purchase what I needed online and pick up at the store on my way home from work. Time saver!
- 1 Wood board – 1in X 8in X 8ft.
- Stain. Here is the exact color I used.
- Paint (whichever color you prefer)
- Wipe-on Polyurethane, which I bought at Lowe’s for a previous project. But you can buy it on Amazon.
- 1/2 yard of twisted jute twine in whichever color you prefer. I went with natural. Buy the exact one on Amazon.
- *Wood glue: Only if you are joining two pieces of board to make the sign tall enough. I’ll explain below. Here is the exact one I have.
INSTRUCTIONS
- Measure the wood board. For this particular project, we want our sign to be two feet or twenty-four inches long. Make a mark with your pencil. Remeasure, to be sure. Take it from my husband’s grandfather, a carpenter, who always says “Measure twice, cut once.”
- On the marking, make the cut.
- *If the original wood board is 1in X 8in, skip this step. The boards I had on hand were 1in X 4in which meant I had to glue both boards in order get the measurements I needed. If this is your case, then glue the two boards together and let them sit overnight. A few hours will work. However, I wanted to make sure they would “stay together.” (singing)
- The creative part begins. Pick whichever stain color tickles your fancy and stain that puppy. Let each coat sit for 3-6 hours. Two layers of paint will make the stain color richer. For my sign, I did two coats of gel stain I had on hand.
- Optional. Hold on to your goggles. Give the wood board some character by beating it up with a sock full of nails, screws, nuts, and bolts. (Fun, until the sock can no longer hold together, breaks open and nails bolts and everything else attack from all angles!) It’d be fun they said! Take a few deep breaths after beating-up the board. “Ahhh!” Don’t you feel better? That’s a stress reliever for sure. All kidding aside, please be careful. Maybe double up the sock once you notice a few holes.
- Paint the corners black to give the board more depth. Using the dense foam brush, stroke with pressure on the edges and lighter pressure towards the center. This procedure provides the lettering a focal point by fading into the center. When finished, wash the brush and let it dry. Allow a few hours for the paint to dry.
- Using the same brush, apply a light coat of white paint all over the board. Remember, soft strokes. This step softens the look of the board and makes it look washed almost. Dry for approximately 3 hrs.
- After, sand it.
- Outline the letters using the plastic letter stencils. Yippee!
- Once outlined, get to painting! Pick another color and paint inside the outline. Let the paint sit for a few hours.
- When the letters are dry, put a coat of polyurethane over everything to protect your hard work. Allow time for drying.
- Drill two small holes at the top corners for hanging. You can choose other hanging tools, but I chose twine because it was what I had on hand.
- Pass the twine through the holes and make a knot. Hide the knot behind the sign
Congratulations! The last step sealed the deal to you joining the DIYer gang. That wasn’t so bad, right? If you completed this project as a first time DIYer, it means you took a chance on something new, and a pat on the back is deserved.
My brother in law loved the sign. Now the “Welcome” sign has a good home and it put a smile on the owner’s face.
In the future, use this DIY tutorial to make any small wood sign for your home.
Here is the only photo I was able to find. Courtesy of my iPhone 6!

Turning it over to you. What DIYs have you attempted? Brag about your projects in the comments below, because after all that hard work, you have bragging rights!
If you enjoyed this post, share it with your DIY buddy and build one together. As always tag me in your DIY results.
Thank you so much for reading!
With love and gratitude,


Leave a Reply